
This past 3 weeks has been all about Android Lollipop 5.0, material design, the Nexus line, and the all new Factory Images for Nexus Devices released and posted by Google on date (11-12-14)! A trusted source and method I have used in the past to install factory images plus adding ease of use on your Nexus device, (beginners edition) only qualified devices apply for now! Presenting The WugFresh Nexus Root Toolkit method now on v1.9.6 as of (11-14-14), is a very powerful/useful utility providing ease of access with most Nexus devices! Bring the ability to unlocking the bootloader, relocking the bootloader, root access, factory images, and much more!

Introduction
I will be talking about the Nexus Line In this post, giving all a very simple method walkthrough, how to flash the all new Lollipop 5.0 official release on a Nexus device plus unlocking the bootloader! With a Nexus device this can be achieved in numerous ways like ADB with the Android SDK and for root and more have a look at chainfire auto root for (advanced users), plus feel free to check out a good friend of mine Rootjunky.com for a great video walkthrough on that method here! (Disclaimer I am NOT responsible for what happens to your device by any means, This is the method I used and it worked flawlessly for me with no help from anyone (just saying)! You must know your model number, version of Android you are running, a near fully charged battery, and install all necessary drivers on your PC/MAC/ Linux for your respected device. Next read my post talking about which devices have this update and last read all of my instructions Three times before you proceed but note this is still for Beginners. With all that said its time to talk about flashing a stock OEM .tgz on your Nexus device the (beginners edition)!

The Basics, Prerequisites, and Need to Know Info
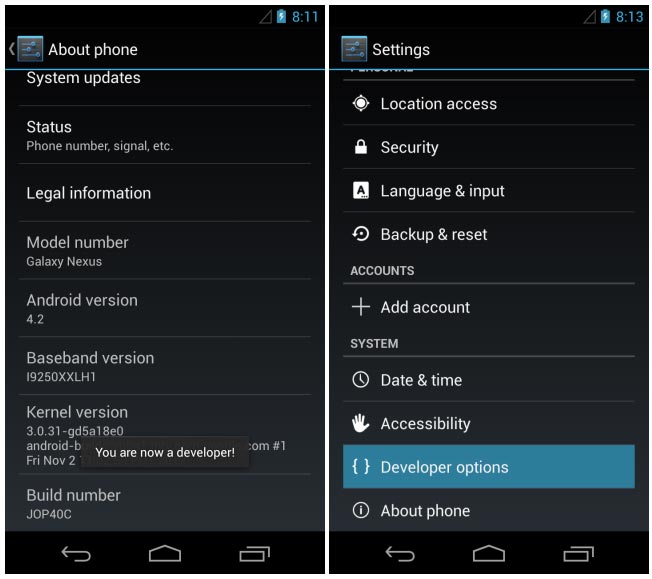
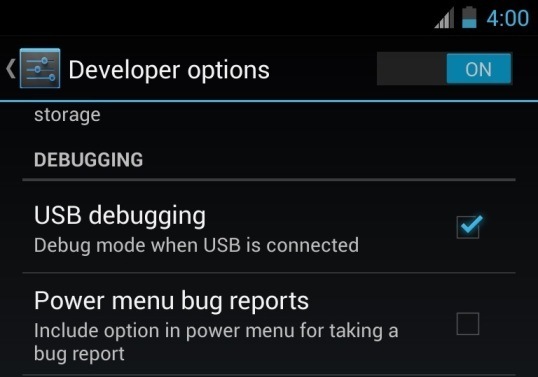
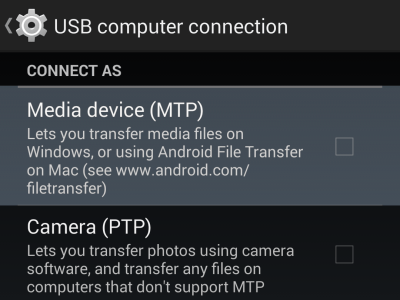
When using The WugFresh Nexus Root Toolkit method you will need to start with a qualified device, for example I’m using a Nexus 7 (2012) (Wi-Fi) aka nakasi. A older device but still supported under Google’s road map of supported devices! Next you will need a PC/MAC/ Linux computer but I will only be talking about the Windows 7 (64bit)PC approach in this post, after that download and Install the WugFresh Nexus Root Toolkit on your Windows PC. Moving on to your Nexus Android device you will need to enable Developer options, under Settings/About phone or About tablet/ then Multi click on the Build number selection seven times. Next enable USB Debugging under, Settings/ Developer options then check the box next to Android debugging. Now plug in your Nexus Android device via USB charging cable from your device to your Windows PC. Next lets run the WugFresh Nexus Root Toolkit application on your Windows PC. Within the Root Toolkit you will be asked what device you have and what OS you are running on your Android device (answer accordingly)? Next driver installation, (key to getting this all going smooth) you must have the appropriate drivers installed correctly to be able to use Android MTP (Media transfer protocol), and Fastboot mode (stock Android recovery).


Knowledge, More Preparation, and Unlocking the Bootloader
The next process we will need to do is unlock the bootloader, (Note to self) when unlocking a bootloader you will be fully wiping your device of all system and user data aka everything except for the bootloader itself, so backup your device before you hit this step! There are a bunch of apps like titanium backup and Helium within Google Play, plus you can use a simple USB charging cable to backup your files by using the WugFresh Nexus Root Toolkit Backup+Restore option (so don’t be that guy not making a backup just saying)! Last note for all Nexus device owners after all set and done you can do a simple ADB OEM relock command from within this toolkit or from a command prompt within the Android SDK folder itself (No worries and moving on)! After updating your device information in the root toolkit on your Windows PC you will be greeted with the first (screenshot below) on your PC’s monitor, click under Unlock (Unlock) to begin this process.


Fastboot Mode, Bootloader Unlock, and Android Lollipop 5.0 Install
This process is very straightforward, just follow each prompt correctly. This will put your Android device into Fastboot mode allowing the Bootloader Unlock process to begin and complete. When done your Android device will need to reboot and after that you will be greeted with a fresh clean OS so set it back up (just get it back to the home screen). Next you will need to enter settings again to re enable Developer options and USB Debugging (settings can be found in the application drawer). Within the toolkit on your Windows PC you need to click under Back to Stock (Flash Stock + Unroot) to begin the process of installing Android lollipop 5.0. Follow each step by picking Android lollipop 5.0 and installing it to your device. The WugFresh Nexus Root Toolkit will guide you through the download process necessary for your device (stock OEM .tgz OS)! This will put you back into Fastboot mode and install the new OS of Android.


Installation completed and job well do on your part, you should now be on Android Lollipop 5.0
Your Android device will reboot to the all new Android lollipop 5.0 update, the brand new Google OS (congratulations you are now up to date)! At this point you can reset up your device the way you like or move to the next step of Root access (no need to reset up your device after rooting, FYI no Data will be lost so all settings will be saved at this point)! Please feel free to play around in the new OS before moving to the Root procedure (you know I did Lol)! Next steps are for (Advanced users) so beginners be aware!

Now let’s go one step deeper (Would you like to know more), like root access? In my Starship Troopers The movie voice! (Advanced users)
At this part I will be guiding you to trusted links on how to do this process because the next steps are for (advanced users) and not (Beginners), as of this post (11-16-14) there is no easy way to do this (but easy for a advanced user). I will get you started but I must let the links speak for themselves, for the fact that I stated earlier (Advanced users). On your Android device you will need to enter settings again to re enable Developer options and USB Debugging (settings can be found in the application drawer). On your PC you will need to download chainfire auto root, my good friend Thomas Sergeant aka Rootjunky.com has you all covered with a great YouTube video walkthrough method just by clicking here! Soon, we all will be able to do this within the Root Toolkit in the future but in my testing it will not root my device (I have tried many a times with the results of it not working at this point)! I will update you all in this post as soon as this feature becomes available and future relevant updates come out! I hope I helped you achieve a tasty lollipop treat for weeks to come and thanks for your time, Cheers all and have a nice day!

Please feel free to comment below, on Google Plus, Joshua Bane YouTube channel and other social media!
Update: As of making this post WugFresh Nexus Root Toolkit method moves onto v1.9.7 and now available for download as of (10-16-2014) today. Please feel free to update but with this new update I still can’t achieve root access with it on my device at this time.
Update: Now on to v1.9.9 click here for the update. With this new update I’m still unable to achieve root with the WugFresh Nexus Root Toolkit method. Click here for more updated information.
Update: Rootjunky.com has partnered with WugFresh to bring us brand new video tutorials, this playlist can be found here.
September 28, 2014 was the date I started writing for Bane-Tech, and happy to have meet a great friend Joshua Bane! I enjoy technology and love to update and teach people on how-to get the most out of their tech! That's me to date but subject to change
Cheers all because I'm Rooting for you!!!
- Get $6 in Google Play Credit for free from Google - February 7
- Save up to $140 at Motorola.com – Updated - February 3
- Obesity awareness – Drop and Give Me 20 YouTube Challenge – Updated - February 2

